What is an Anti-Siphon Tube?
 In paintball an anti-siphon tube is a tube usually made out of brass that is installed in a co2 tank. It helps prevent liquid co2 from entering your marker. If you use co2 and want to increase your consistency and efficiency then an anti-siphon tube wouldn't be such a bad idea. Also if you experience "snow" coming from the tip of your barrel after you shoot, your marker probably is consuming liquid co2, and an anti-siphon would help greatly. In paintball an anti-siphon tube is a tube usually made out of brass that is installed in a co2 tank. It helps prevent liquid co2 from entering your marker. If you use co2 and want to increase your consistency and efficiency then an anti-siphon tube wouldn't be such a bad idea. Also if you experience "snow" coming from the tip of your barrel after you shoot, your marker probably is consuming liquid co2, and an anti-siphon would help greatly.
How does it work?
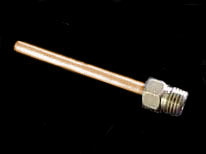
The anti-siphon device operates very simple. The tube is installed onto the co2 valve and it bends upward to where the co2 is in a gaseous form. The picture below shows exactly how it works.

Reasons why you wouldn't want an anti-siphon tube:
- Anti-siphon tubes only work with co2 tanks. If you use nitro or compressed air, then it wouldn't have an effect at all.
- If you use a remote on your tank the co2 in gas form is already at the top of the tank by the valve, so if you put an anti-siphon on a tank that's vertical, it would just suck in the liquid co2 and cause more problems.
- If on your marker your tank setup is so that your tank is vertical, you do not want to use an anti-siphon tube for the exact same reasons as using a remote.
How to get one installed.
Your local shop should be able to install an anti-siphon tube for no more than $15.00 to $20.00. Remember to bring your marker and your co2 tank with you because they need to know what direction is upward on the co2 tank, so they will know what way to bend the tube.
If you are mechanical inclined and are confident then you could probably install one yourself.
Installing an anti-siphon tube yourself:
To install an anti-siphon, you will need the following: heat gun or torch, 7/8 or 15/16" or adjustable wrench, vice, rubber strip or old leather belt or loop wrench, blue or red lock-tite, and an anti-siphon tube (bought or home made). If you choose a home made, the length should be about 2/3 the length of the tank.
1. Find "UP" Position and mark it on the valve with marker You will also need to find out which is the top of the tank when it is screwed into your marker. Not all anti-siphon tanks have the same "up" location. Screw in your tank all the way in the ASA like your going to gas the marker. Either use a piece of tape or marking pen, mark the "up" position of the tank and valve.
2. Completely empty co2 tank
If you the tank isn't empty and you take the valve off, then you could seriously injure yourself or others.
3. Remove co2 valve
An easy way is to hold the co2 tank vertically upside down, and place the valve head into a table clamp. Then turn the tank clockwise. If it is hard and isn't budging you might want to gently heat the valve where it connects with the tank to loosen up any lock-tite that was used.
4. Screw in anti-siphon tube in co2 valve
If you bought a anti-siphon tube made for paintballing it should simply screw into the end of the valve. You can make your own tube.
If your going to make your own, you will need the following: a 1/8" pipe plug, brass tubing about 2/3 the length of the tank and 3/16 to 1/4" outside diameter (I have used 3/16" mostly), a drill bit the same diameter as the tubing, and solder and soldering gun or torch. Also a file is good to have.
Drill in the center of the pipe plug with the drill bit. Make sure that the tubing fits. File a little around the tubing so that it will slide in the hole. Also, if you purchased a foot long piece of tube and cut it, file the sharp edges. Make sure to blow any filings from the tube, inside and out. The tube should slide in the just drilled pipe plug about 1/4". Solder in place. Be sure there is no obstruction and that the solder will hold.
5. Bend the last 2 inches or so of the tube upward based on the mark on the valve you made
Remember that mark you made on the valve and tank? Here is what it is for. Carefully bend the tube towards that mark. The ideal bend is a nice radius. Nothing sharp. If you do crimp it, you're basically cutting off or even blocking the inside of the tube, which will hamper the gas travel. You also need to have the bend as close to the inside tank wall as you can. Blow out any foreign particles and secure the pipe plug with a small dab of lock-tite.
6. Put Lock-tite on valve threads and screw it back on co2 tank
Allow the lock-tite to dry for at least 12 hours before filling it. CO2 has a tendency to keep the loctite compound from drying. Mark the tank in some way that it is an anti-siphon tank. Don't forget to install the burst disk. Your done!
|